Avengers Gluten Free Zebra Cake

Wednesday, 7 September 2022

Avengers Gluten Free Zebra Cake

I made this gluten free Avengers zebra birthday cake for my nephews 10th birthday. I wanted to make something different so decided to mix chocolate and vanilla together. 

This cake did not turn out well at all inside hahaha. Somehow little rocks formed! My sister said did you put rice bubbles in here. I didn't. I don't know what happened it didn't work out but it did look good. I would love to try again especially for the icing which saved the cake because the next day it was soooo dry inside haahah.

I completely forget to photograph inside but its for the best because it looked a mess. It looked more like a chocolate cake with specks of vanilla inside. 

The Avengers flying on top of the cake and the personalised cake topper I got from eBay.

Let me know if you try it and it works!

Avengers Gluten Free Zebra Cake

Base vanilla cake batter:

1 1/4 cups (300 grams) lactose free milk or any dairy free milk, room temperature
2 tsp apple cider vinegar (to be mixed with dairy free milk)
3 2/3 cups (460 grams) gluten free plain flour
2 tsps baking powder
1 tsp baking soda
1 cup (220 grams) white sugar
3/4 cup (170 grams) flora margarine or any dairy free margarine, room temperature
3/4 cup (190 grams) mashed bananas (3 small or 2 large) or pureed applesauce, room temperature
1 tbsp vanilla extract

For the chocolate cake batter:

1/3 cup (33 grams) cocoa powder
1/4 cup (60 grams) Zymil lactose free milk or dairy free milk
2 tbsp dairy free margarine or butter, melted and cooled

Buttercream

2 cups (460 g) dairy free margarine or vegan butter, room temperature
1 cup (100 grams) sifted cocoa powder
3 cups (600 grams) sifted powdered sugar
1/4–1/3 cup dairy free milk (such as soy milk or oat milk)
 

Instructions

Preheat the oven to 180C/350 F. Grease two 20cm/8″ cake pans with cooking oil, and line them with baking paper/parchment paper. Set aside.

Prepare the buttermilk. Combine the milk with the apple cider vinegar, and set aside to sit for 5-6 minutes. 

In the meantime in a medium bowl, stir together the flour, baking powder, and baking soda. Set aside.

Make the vanilla batter: In a stand mixer with paddle attachment or a large bowl with hand mixer, cream together the margarine and sugar until fluffy, about 2-3 minutes. Scrape down the sides as needed. Then add in the pureed banana or applesauce and vanilla extract. 

Mix again on medium speed until combined, scraping down the sides as needed. Add in about half of the dry mixture, along with half of the buttermilk, and mix on medium speed until just combined. 

Add in the remaining dry mixture and buttermilk and mix on medium speed until there are no more dry streaks. Make sure to scrape the bottom of the bowl as well as the sides.

Make the chocolate batter: divide half of the vanilla cake batter into a separate bowl. Add in the cocoa powder, remaining dairy free milk and melted butter into one of the bowls. Stir the ingredients gently into the batter until it becomes a chocolate cake batter.

I DON'T UNDERSTAND THIS PART AT ALL BUT HERE ARE THE INSTRUCTIONS:
How to make a zebra pattern in the batter: now we’ll divide the batter into the cake pans in a zebra pattern.  Take a large spoon and spoon about 1/4 cup of vanilla batter into the middle of both cake pans. Then take another large spoon and spoon about 1/4 cup of chocolate batter directly on top of the vanilla cake batter. 

Repeat, alternating between vanilla and chocolate cake batter until the batters are finished. Gently tilt the cake pans to get the batter to touch the edges of the pan if they aren’t already. Do not tap the cake pans onto countertop. This will release any air bubbles that will help the cake rise.

Bake the cakes immediately after creating the zebra pattern. Bake for 35 - 45 minutes or until the toothpick comes out clean.

Remove from the oven and allow the cakes to cool in their pans for 10 minutes, then transfer them to a cooling rack to cool completely. Once cooled completely (there is absolutely no warmth to the touch!), then you can prepare your buttercream.

Buttercream
In a large bowl with a hand mixer, cream the butter until fluffy and light, about 2-3 minutes.

Add in the cocoa powder and 1 cup of the powdered sugar. Continue creaming the mixture, adding in the remaining icing sugar in 1 cup intervals until smooth. Add in 1-2 tbsp dairy free milk at a time to help achieve a creamy texture.

Ice the cake as desired, slice and enjoy!


The original recipe is from Banana Diaries and here is the buttercream recipe.


Gluten & Dairy Free Chocolate Coconut Balls

Monday, 22 August 2022


I saw a can of condensed coconut milk which excited me no end and had to make gluten free and dairy free chocolate coconut balls. At Coles is where I found the condensed milk and on the can is where I found the recipe but changed the biscuits to gluten free.

So easy to make and taste absolutely delicious to eat. You would never know the difference. 

Enjoy.


Gluten and dairy free chocolate coconut balls

Ingredients
1 packet (205g) Leda Arrowroot Biscuits (Gluten, dairy, egg free and plant based from Coles)
1/3 cup (40g) cocoa powder
1/2 cup (45g) desiccated coconut
(Extra for rolling balls in)
1 tin (320g) Condensed coconut milk

Method
Crush biscuits and place in a mixing bowl.

Add cocoa and coconut and stir together.

Add condensed milk and mix until combined.

Take small amount of mixture and roll into balls then roll around on extra coconut to coat the outside of balls.

Place the chocolate balls on a tray and into the fridge to chill for 30min.

Remove from tray and store in an air proof container and enjoy

Figs in Syrup

Saturday, 4 June 2022


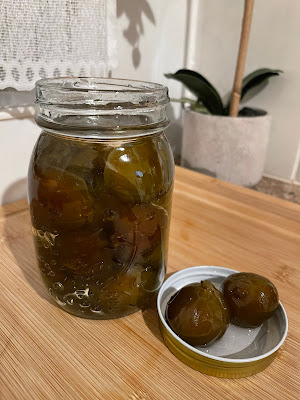
We cut down our fig tree because it attracted all the wildlife but there were many small figs on the branches so I picked them and with my sisters suggestion I made figs in syrup.

The recipe I found said to use almonds and pour lemon juice on the figs which I did but I don't think this is necessary so I will take these steps out of the recipe. If you want to follow full recipe just click on link at bottom of page. 


Figs in Syrup

Ingredients
25 figs
1 kilo sugar
25 cloves
3 cups of water

Method
Rinse figs thoroughly.

Put them in a big pan with a lot of water and boil them for about 10 minutes.


 Strain them and rinse them with cold water. Put them back into the pan and boil them again for another 10 minutes. Strain them and put them in the same pan with cold water and leave them over night.

 The next day, change the water and boil them again. They should be soft and tender in 10 minutes. 

Strain them and place them on a towel and let them stand for 24 hours so that they will not have any more water inside them. 


Then insert a clove in each fig. (Original recipe called for almonds but they do absolutely nothing so skip this part).


Put 3 cups of water in a clean pan and stir in sugar to dissolve. Bring the syrup to the boil for 10 minutes. Skim the foam if necessary. 


Add the figs and continue boiling for another 10 minutes. Let them stand until the next day.


 The next day start the boiling again until you have a thick and sweet syrup.


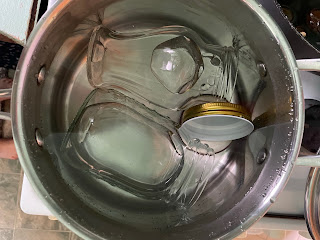
Sterilize jars by boiling them for 10 minutes then let stand to cool. Sterilizing will add 3-4 years storage of the figs.


 Place figs in syrup in jars and store or enjoy straight away.


Original recipe for the figs in syrup is here


Gluten Free Zucchini Lemon Cake


Gluten Free Zucchini Lemon Cake

Gluten Free Zucchini Lemon Cake Slice

Easy Gluten Free Zucchini Lemon Cake

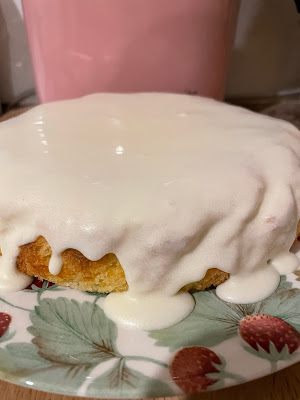
I found this very yummy recipe for Zucchini, Lemon & Poppyseed cake in the Woolies magazine. I don't like poppy seeds so I took those out and I changed it to be gluten free. 


I used a trombocchino zucchini I have growing in the backyard and got a deliciously divine cake.


This is a super easy, light and fluffy gluten free cake to make. You can't taste the zucchini at all this is a lovely lemon flavoured caked that is so delicious. I hope you try it.


Gluten Free Zucchini Lemon Cake

Ingredients
1 small lemon
2 free range eggs
1/2 cup Woolworths rice bran oil
1 tsp vanilla extract
1 cup caster sugar
2 cups Woolworths gluten free self-raising flour
250g zucchini (2 zucchinis), finely grated

Icing
1 1/2 cups pure icing sugar, sifted
1 tsp dairy free butter or margarine, softened
2 tbs dairy free milk  (I used Macadamia Milk)


Method
1. Preheat oven to 180°C/160°C fan-forced. Grease a 20cm  (7cm deep) round cake pan. Grease and line base and sides with baking paper.


2. Zest and juice the lemon. Whisk together the eggs, oil, vanilla, caster sugar, zest and lemon juice in a large bowl until smooth and combined. Stir in gluten free flour and zucchini until just combined. This will make sure the cake will come out light and fluffy. 


3. Pour mixture into cake pan and bake for 45 minutes or until a skewer inserted in centre comes out clean. I found I had to bake it for 60 minutes. Cool cake then transfer to a wire rack to cool completely.


4. Combine icing sugar, butter and milk in a medium bowl to form a thick spreadable icing. Spread icing over cake and serve.


You can find original recipe here


Easy Lactose Free Rice Pudding Recipe

Tuesday, 17 May 2022


Lactose Free Rice Pudding

Easy Old Fashioned Rice Pudding Recipe

Thick and Creamy Rice Pudding Recipe

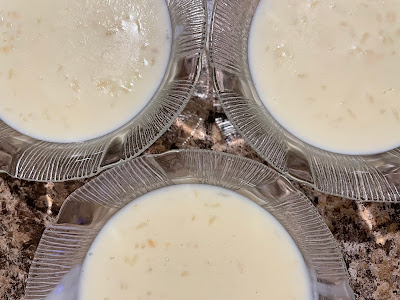
We had a carton of Liddell's lactose free milk in the fridge and my sister said make rice pudding and here we are.

I was surprised to find that people are putting eggs in their rice pudding! Oh no, no, no, no, no! Yuck. 

This is a simple, easy rice pudding recipe as it should be of rice, milk, sugar and some vanilla extract and the last can be omitted because you don't even need it. Plus a pinch of salt to help the rice cook.

I have to say it's nicer to say rice pudding in Greek which is rizogalo. It's a lovely word. The English word is so plain and boring. So sad hahahaah

Anyway this is a simple lactose free rice pudding recipe easy to make and is ridiculously thick, creamy and delicious. You will definitely enjoy.


Lactose Free Rice Pudding

Ingredients
2 1/2 cups (600ml) lactose free milk
1/2 cup water
1/3 cup (66g) uncooked short grain white rice
Pinch salt
1/4 cup (50g) sugar
1 teaspoon vanilla extract


 Method

1. Wash the rice under cold running water until water comes out clear.

2. In a medium sauce pan stir together the lactose free milk, water and rice.

3. Add the rest of the ingredients of salt, sugar and vanilla extract and mix continuously as mixture comes to a boil over high heat. 

4. Once it starts boiling reduce the heat to low and simmer until the rice is tender which is around 20-25 minutes. Stir frequently to prevent the rice from sticking to the bottom of the pan. 

5. The pudding will thicken as it cools; when it is warm, it will be a bit on the runny side.

Serve warm or cold. I love rice pudding warm so eat up once you plate.


Original recipe is from Simply Recipes

Related Posts Plugin for WordPress, Blogger...

Sia's Cooking Blog Designed by Ipietoon Blogger Template